Mounting and dismounting
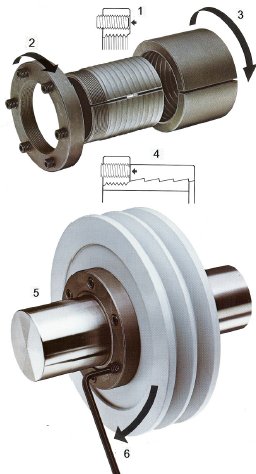
Mounting
Check to see that the locking screws do not protrude from the rear of the nut.
Tighten the nut on to the inner sleeve as far as it will go.
Thread the outer sleeve on to the inner until it abuts the nut. Note that the outer sleeve has a left-hand thread.
Insert the locking screws until they loosely abut the outer sleeve.
Insert the shaft and mount the hub.
Tighten the locking screws alternately. Check that they are properly tightened by turning all screws twice more. (Where maximum torque transmission must be guaranteed, a torque wrench is recommended.)
Following to be strictly adhered to:
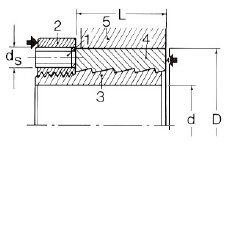
Leave approximately 1 mm between the nut and the hub. (fig 2)
During mounting the outer sleeve (4) and the hub (5) move from the nut in axial direction.
After mounting the hub must not touch the shoulder on the shaft. Therefore, it is important to leave a space between the hub and the shoulder.
If the outer sleeve cannot be moved in axial direction the inner sleeve will slide on the shaft in the direction of the nut. The friction losses that occur result in a lower torque capacity. The torque capacity when the bushing is mounted in this way will be 70% of the listed capacity.
Dismounting
Loosen the locking screws so that they are not in contact with the bushing.
Slightly loosen the nut.
Apply light blows to the nut or the outer sleeve, so that the tapered section of the thread releases its grip.